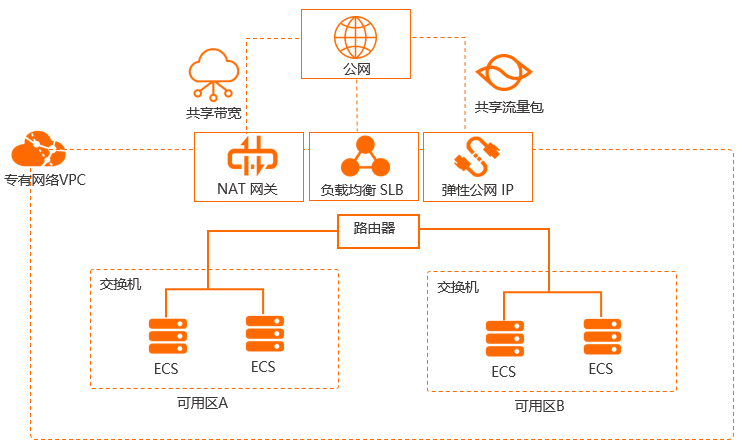
云服务器(Elastic Compute Service, ECS)是一种简单高效、安全可靠、处理能力可弹性伸缩的计算服务。其管理方式比物理服务器更简单高效。
云服务器概述
1.云服务器是云计算服务的重要组成部分,是面向各类互联网用户提供综合业务能力的服务平台,整合了传统意义上的互联网应用三大核心要素:计算、存储、网络,面向用户提供公用化的互联网基础设服务。
2.技术
3.特点
高密度(High-density)
低能耗(Energy-saving)
易管理(Reorganization)
系统优化(Optimization)
4.服务
负载均衡(Load Balance,BLB)能够均衡应用程序的流量,将前端并发访问转发给后台多台云服务器,实现业务水平扩展,通过故障自动切换,及时地消除服务的单点故障,提升服务的可用性。
关系型数据库服务(Relational Database Service,RDS)是专业、高性能、高可靠的云数据库服务。RDS提供WEB界面进行配置、操作数据库实例,还为用户提供可靠的数据备份和恢复、完备的安全管理、完善的监控、轻松扩展等功能支持。
对象存储服务(Baidu Object Storage,BOS),支持单文件最大5TB的文本、多媒体、二进制等任何类型的数据存储。
云磁盘服务(Cloud Disk Service,CDS)是一种安全可靠的高弹性存储服务,作为云服务器的扩展块存储部件,为云服务器数据存储提供高可用和高容量支持。
简单缓存服务(Simple Cache Service,SCS)是是高性能、高可用的分布式内存缓存服务。
内容分发网络(Content Delivery Network,CDN)将源站内容分发至全国所有的节点,缩短用户查看内容的延迟,提高用户访问网站的响应速度与网站的可用性。
5.性能要素
云服务器两个关键维度:CPU和内存。基本上云服务器小型规格为1vCPU和2GB RAM;云服务器中型规格为2vCPU和4GB RAM;云服务器大型规格为4vCPU和8GB RAM。
安全组配置 更新镜像
1 2 3 4 5 6 7 8 wget -O /etc/yum.repos.d/CentOS-Base.repo http://mirrors.aliyun.com/repo/Centos-7.repo yum clean all yum makecache yum -y update
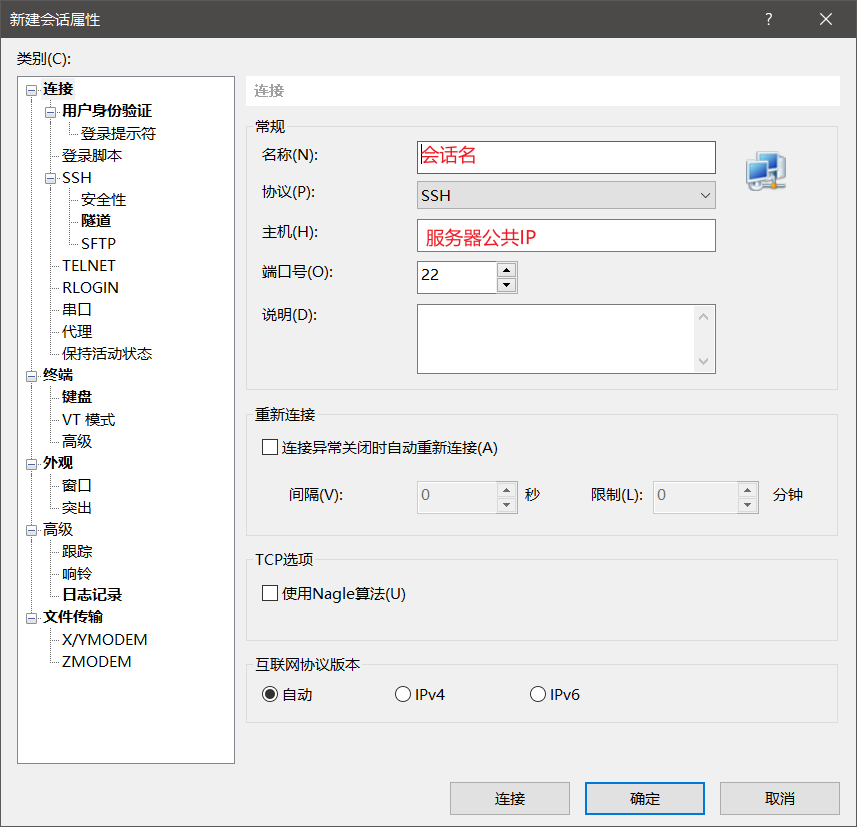
工具 1.Server Connection Tool
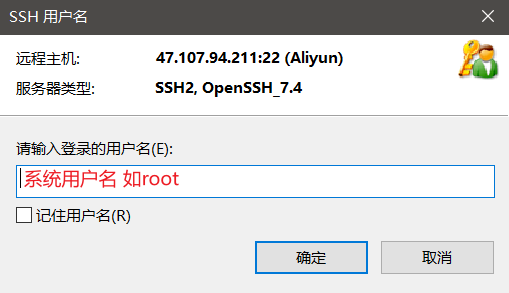
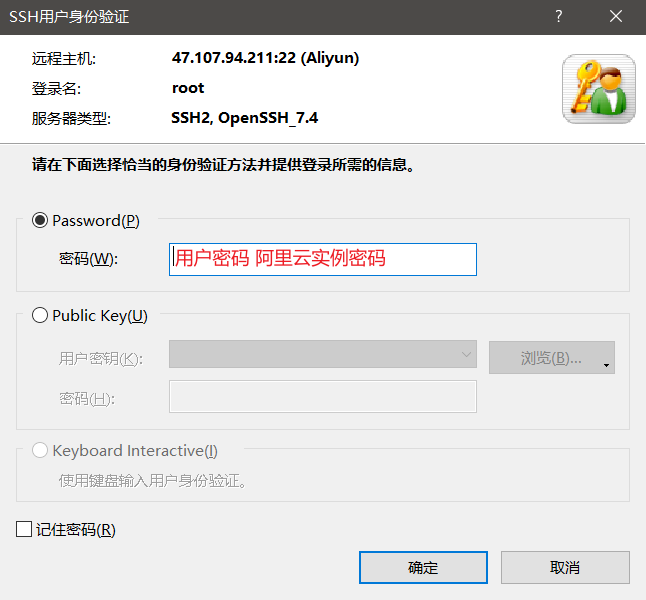
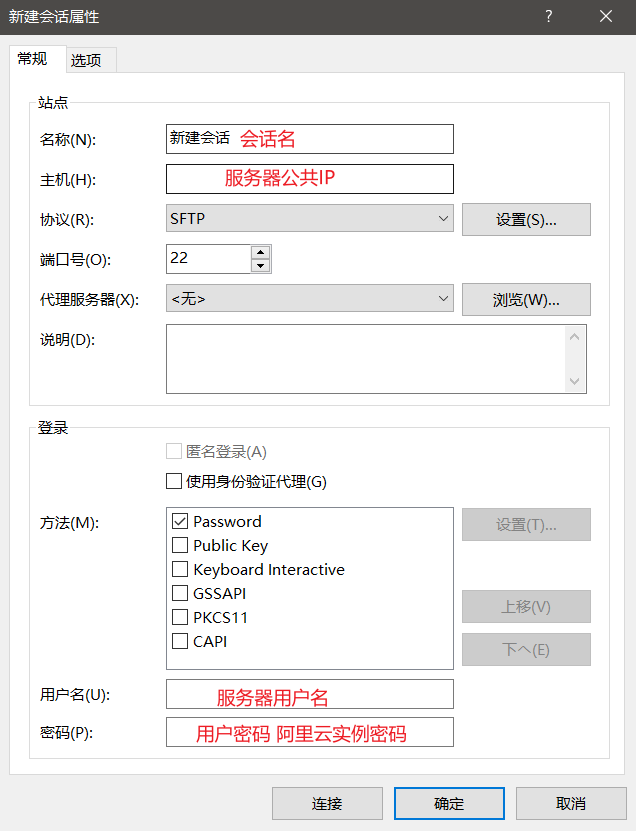
Xshell是Netsarang Computer推出的的Secure Shell、Telnet和Rlogin虚拟终端,支持SSH1,SSH2,以及Microsoft Windows平台的TELNET协议。Xshell可以为每个主机创建单独的会话,用户可以通过标签查看每个会话,方便同时操作和管理与主机的会话。
1.新建会话
Xftp是一个基于 MS windows 平台的SFTP、FTP 文件传输软件。使用Xftp,MS windows 用户能安全地在 UNIX/Linux 和 Windows PC 之间传输文件。Xftp能同时适应初级用户和高级用户的需要。它采用了标准的Windows风格的向导,它简单的界面能与其他 Windows应用程序紧密地协同工作,此外它还为高级用户提供了众多功能特性
1.新建会话
1.更改语言 工具->更改语言->Chinese simplified
环境搭建 HTTP服务
云服务器访问对应静态资源503,可能是没有安装对应HTTP服务
Apache
Apache起初由伊利诺伊大学香槟分校的国家超级电脑应用中心(NCSA)开发。此后,Apache Httpd被开放源代码团体的成员不断的发展和加强。
2009年12月数据显示Apache的市占率已经降为53.67%,IIS降为18.26%,谷歌网页服务器13.53%,nginx 8.75%。
Apache支持许多特性,大部分通过编译的模块实现。这些特性从服务端的编程语言支持到身份认证方案。一些通用的语言接口支持Perl,Python,Tcl, 和PHP。流行的认证模块包括mod_access,mod_auth和mod_digest。SSL和TLS支持(mod_ssl),代理服务器(proxy)模块,很有用的URL重写(由mod_rewrite实现),定制日志文件(mod_log_config),以及过滤支持(mod_include和mod_ext_filter)。Apache日志可以通过网页浏览器使用免费的脚本AWStats或Visitors来进行分析。
Apache的2.x版本核心在Apache 1.x版本之上作出了重要的加强。这包括:多线程,更好的支持非UNIX平台(例如Windows),MPM,新的Apache API,以及IPv6支持。
1
2
3
4
5
httpd -version yum install httpd service httpd start service httpd status service httpd restart
1.主配置文件(/etc/httpd/conf/httpd*.*conf)
You should add your website content to the directory /var/www/html/.
To prevent this page from ever being used, follow the instructions in the file /etc/httpd/conf.d/welcome.conf.
2.日志目录(/var/log/httpd)
ssl反向代理失败->观察日志->ssl_error_log
[Fri Apr 15 15:23:01.508912 2022] [ssl:error] [pid 16030] [remote 127.0.0.1:8080] AH01961: SSL Proxy requested for zerostone.cn:443 but not enabled [Hint: SSLProxyEngine]
how to configure apache server to talk to HTTPS backend server?
SSL 1.开放443端口
2.下载Apache对应ssl证书
3.yum install -y mod_ssl命令安装mod_ssl.so模块
4.新建/etc/httpd/conf/cert目录,将ssl证书文件移至该目录
3.配置http.conf(/etc/httpd/conf/httpd.conf)
1
2
3
4
5
6
7
8
9
10
11
12
13
14
15
16
17
18
19
20
21
22
23
24
25
26
27
28
29
30
31
32
33
34
35
36
37
38
39
40
41
42
43
44
45
46
47
48
49
50
51
52
53
54
55
56
57
58
59
60
61
ServerRoot "/etc/httpd" Listen 80 Include conf.modules.d/*.confLoadModule User apacheGroup apacheServerAdmin root@localhostServerName 80 <Directory /> AllowOverride none Require all denied </Directory> DocumentRoot "/var/www/html" <Directory "/var/www" > AllowOverride None Require all granted </Directory> <Directory "/var/www/html" > Options AllowOverride None Require all granted </Directory> <IfModule dir_module> DirectoryIndex index.html </IfModule> <Files ".ht*" > Require all denied </Files> ErrorLog "logs/error_log" LogLevel warn<IfModule log_config_module> LogFormat "%h %l %u %t \"%r\" %>s %b \"%{Referer}i\" \"%{User-Agent}i\"" combined LogFormat "%h %l %u %t \"%r\" %>s %b" common <IfModule logio_module> LogFormat "%h %l %u %t \"%r\" %>s %b \"%{Referer}i\" \"%{User-Agent}i\" %I %O" combinedio </IfModule> CustomLog "logs/access_log" combined </IfModule> <IfModule alias_module> ScriptAlias /cgi-bin/ "/var/www/cgi-bin/" </IfModule> <Directory "/var/www/cgi-bin" > AllowOverride None Options Require all granted </Directory> <IfModule mime_module> TypesConfig /etc/mime.types AddType application/x-compress .Z AddType application/x-gzip .gz .tgz AddType text/html .shtml AddOutputFilter INCLUDES .shtml </IfModule> AddDefaultCharset UTF-8 <IfModule mime_magic_module> MIMEMagicFile conf/magic </IfModule> EnableSendfile on IncludeOptional conf.d/*.conf
4.ssl.conf(/etc/httpd/conf.d/ssl.conf)
1
2
3
4
5
6
7
8
9
10
11
12
13
14
15
16
17
18
19
20
21
22
23
24
25
26
27
28
29
30
31
32
33
34
35
Listen 443 https SSLPassPhraseDialog exec:/usr/ libexec/httpd-ssl-pass-dialog SSLSessionCache shmcb:/run/ httpd/sslcache(512000 ) SSLSessionCacheTimeout 300 SSLRandomSeed startup file:/dev/u random 256 SSLRandomSeed connect builtin SSLCryptoDevice builtin <VirtualHost _default_:443 > DocumentRoot "/var/www/html" ServerName https:// example.cn:443 ErrorLog logs/ssl_error_log TransferLog logs/ssl_access_log LogLevel warn SSLEngine on SSLProtocol all -SSLv2 -SSLv3 SSLCipherSuite HIGH:3 DES:!aNULL:!MD5:!SEED:!IDEA SSLCertificateFile /etc/ httpd/conf/ cert/_www.example.cn_public.crt SSLCertificateKeyFile /etc/ httpd/conf/ cert/_www.example.cn.key SSLCertificateChainFile /etc/ httpd/conf/ cert/_www.example.cn_chain.crt <Files ~ "\.(cgi|shtml|phtml|php3?)$" > SSLOptions +StdEnvVars </Files> <Directory "/var/www/cgi-bin" > SSLOptions +StdEnvVars </Directory> BrowserMatch "MSIE [2-5]" \ nokeepalive ssl-unclean-shutdown \ downgrade-1.0 force-response-1.0 CustomLog logs/ssl_request_log \ "%t %h %{SSL_PROTOCOL}x %{SSL_CIPHER}x \"%r\" %b" </VirtualHost>
反向代理 在ssl.conf(/etc/httpd/conf.d/ssl.conf)添加(443端口反向代理至8080端口)
1
2
3
4
5
6
7
8
9
10
11
... ... .<Proxy *> Order deny,allow Allow from all </Proxy> SSLProxyEngine on ProxyPreserveHost On ProxyRequests On ProxyPass / https: ProxyPassReverse / https: </VirtualHost>
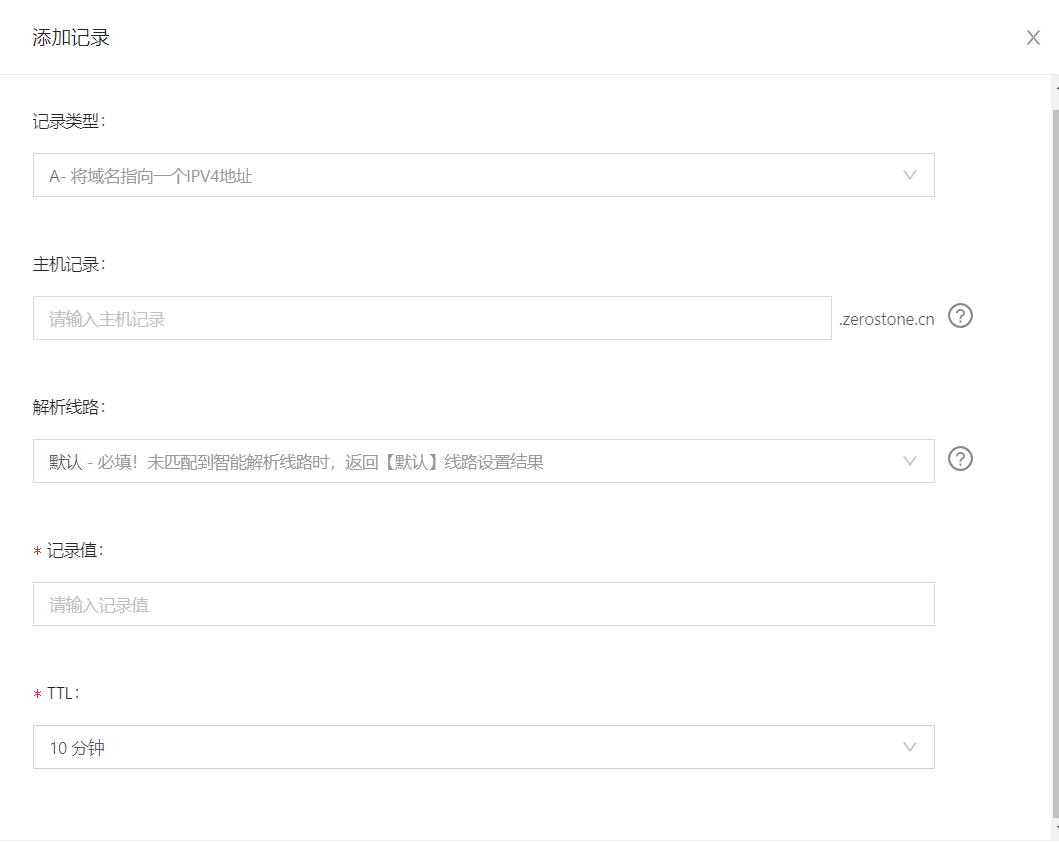
二级域名 1.阿里云设置DNS解析
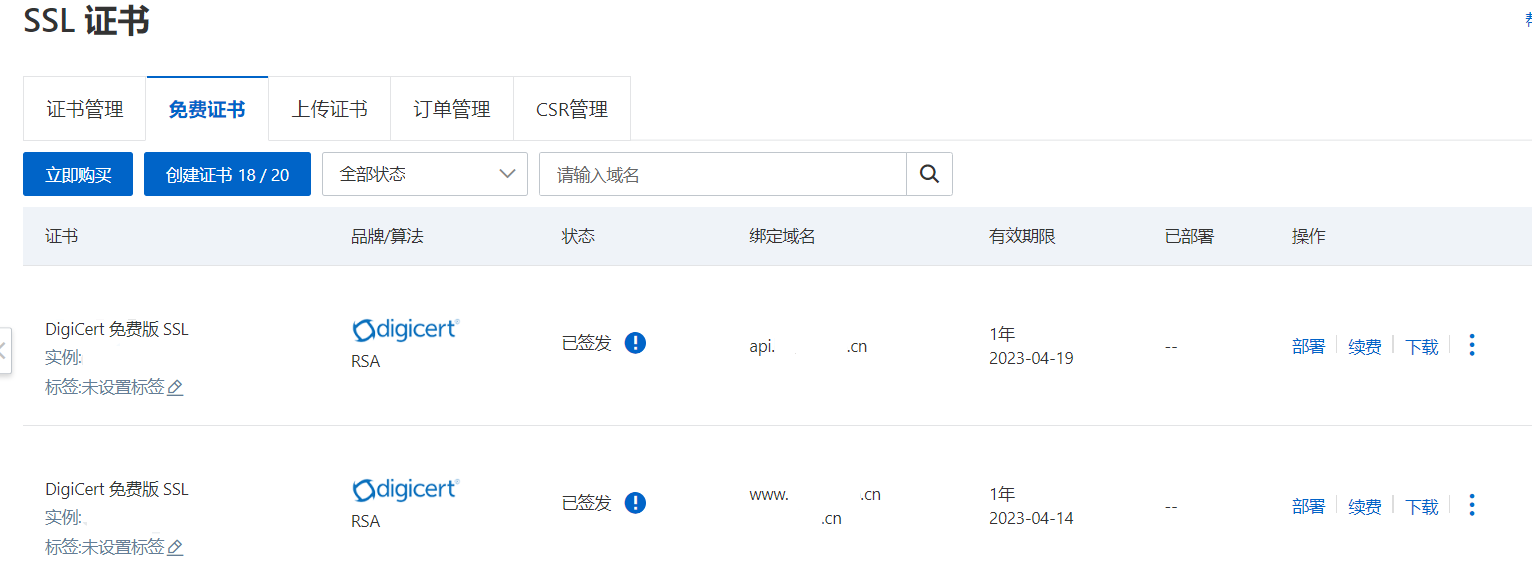
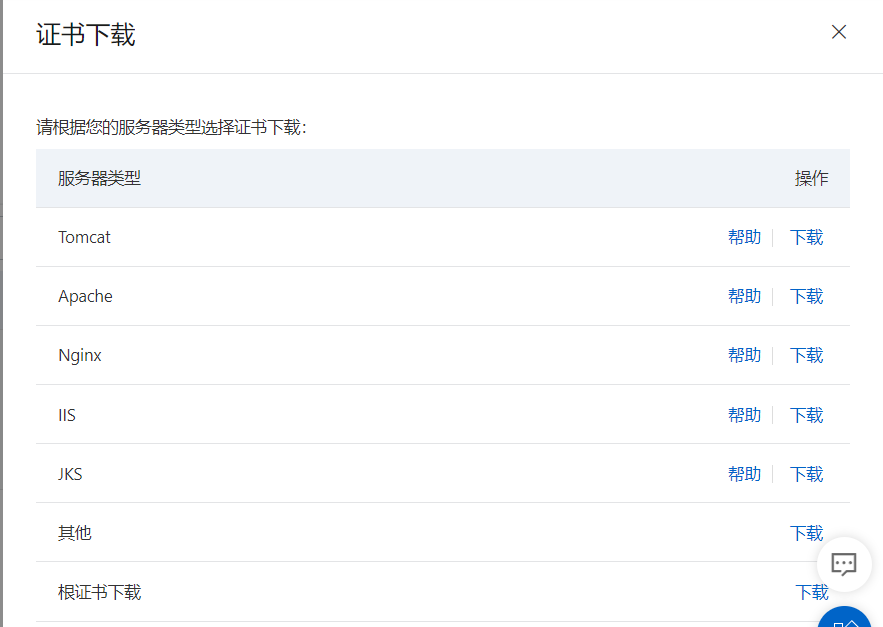
2.签发并下载apache对应子域名的ssl证书(HTTPS)
3.将ssl证书文件移至/etc/httpd/conf/cert目录
3.配置ssl.conf(/etc/httpd/conf.d/ssl.conf)
1
2
3
4
5
6
7
8
9
10
11
12
13
14
15
16
17
18
19
20
21
22
23
24
25
26
27
28
29
30
31
32
33
34
35
36
37
38
39
40
41
42
Listen 443 https SSLPassPhraseDialog exec:/usr/ libexec/httpd-ssl-pass-dialog SSLSessionCache shmcb:/run/ httpd/sslcache(512000 ) SSLSessionCacheTimeout 300 SSLRandomSeed startup file :/dev/u random 256 SSLRandomSeed connect builtin SSLCryptoDevice builtin <VirtualHost _default_:443 > DocumentRoot "/var/www/html" ServerName https: ErrorLog logs/ssl_error_log TransferLog logs/ssl_access_log LogLevel warn SSLEngine on SSLProtocol all -SSLv2 -SSLv3 SSLCipherSuite HIGH:3 DES:!aNULL:!MD5:!SEED:!IDEA SSLCertificateFile /etc/ httpd/conf/ cert/7634480 _api.example.cn_public.crt SSLCertificateKeyFile /etc/ httpd/conf/ cert/7634480 _api.example.cn.key SSLCertificateChainFile /etc/ httpd/conf/ cert/7634480 _api.example.cn_chain.crt <Files ~ "\.(cgi|shtml|phtml|php3?)$" > SSLOptions +StdEnvVars </Files> <Directory "/var/www/cgi-bin" > SSLOptions +StdEnvVars </Directory> BrowserMatch "MSIE [2-5]" \ nokeepalive ssl-unclean-shutdown \ downgrade-1.0 force-response-1.0 CustomLog logs/ssl_request_log \ "%t %h %{SSL_PROTOCOL}x %{SSL_CIPHER}x \"%r\" %b" <Proxy *> Order deny,allow Allow from all </Proxy> SSLProxyEngine on ProxyPreserveHost On ProxyRequests On ProxyPass / https:/ /localhost:8080/ ProxyPassReverse / https:/ /localhost:8080/ </VirtualHost>
Nginx 1.yum
1 2 3 4 5 6 7 8 9 10 wget https://nginx.org/packages/centos/7/noarch/RPMS/nginx-release-centos-7-0.el7.ngx.noarch.rpm rpm -ivh nginx-release-centos-7-0.el7.ngx.noarch.rpm yum info nginx yum --showduplicates list nginx | expand yum install nginx
2.源码编译
1 2 3 4 5 6 7 8 yum -y install gcc gcc-c++ autoconf automake make yum -y install pcre pcre-devel yum -y install zlib zlib-devel make libtool yum -y install openssl openssl-devel
1
2
groupadd nginx useradd nginx -g nginx -s /sbin/nologin -M
1 wget https://nginx.org/download/nginx-1.21.6.tar.gz
1 tar -zxvf nginx-1.21.6.tar.gz
1
2
3
cd nginx-1.21.6./configure
JDK 1.Java Downloads (x64 Compressed Archive)
2.创建/usr/java目录,通过XFTP将jdk-8u321-linux-x64.tar.gz移至该目录
3.解压
1 tar -zxvf jdk-8u321-linux-x64.tar.gz
4.配置环境变量(/etc/profile)
1
2
3
4
export JAVA_HOME=/usr/java/jdk1.8.0_321 export CLASSPATH=$JAVA_HOME /lib/export PATH=$PATH :$JAVA_HOME /binexport PATH JAVA_HOME CLASSPATH
5.重新执行修改文件
6.测试
MySQL CentOS7|MySQL
1.安装MySQL
MySQL community Yum Repository
el8:centos8 el7:centos7
1 2 3 yum remove mysql80-community-release-el8-3.noarch yum clean all
卸载mariadb-libs: postfix-2.10.1-9.el7.x86_64需要libmysqlclient.so.18
1 2 3 4 rpm -qa|grep mariadb yum remove mariadb-libs
1
2
curl -sSLO https://dev.mysql.com/get/mysql80-community-release-el7-5.noarch.rpm curl -sSLO https://dev.mysql.com/get/mysql80-community-release-el8-3.noarch.rpm
1
2
md5sum mysql80-community-release-el7-5.noarch.rpm e2bd920ba15cd3d651c1547661c60c7c mysql80-community-release-el7-5.noarch.rpm
1 sudo rpm -ivh mysql80-community-release-el7-5.noarch.rpm
1 sudo yum install mysql-server
2.启动MySQL
1
2
sudo systemctl start mysqld
1
2
sudo systemctl status mysqld
关闭自启动:sudo systemctl disable mysqld
1 sudo grep 'temporary password' /var/log /mysqld.log
3.配置MySQL
1
2
3
4
5
6
7
sudo mysql_secure_installation
4.测试MySQL
1 mysqladmin -u root -p version
5.使用MySQL
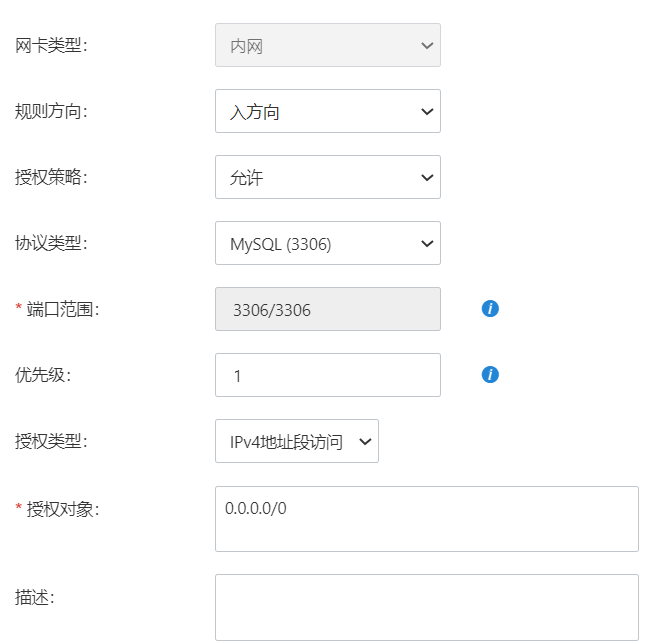
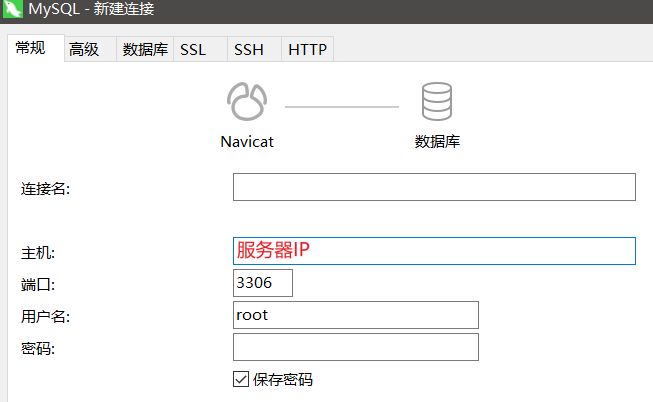
6.Navicat远程连接数据库
1
2
3
4
mysql -u root -p use mysql update user set host='%' where user='root' and host='localhost' ; flush privileges;
Redis Redis
1.下载Redis
1 wget http://download.redis.io/releases/redis-6.2.2.tar.gz
2.解压Redis
1 tar -zvxf redis-6.2.2.tar.gz
3.编译安装
1
2
3
4
5
6
7
8
9
10
yum install gcc-c++ mv /root/redis-6.2.2 /usr/local /redis cd /usr/local /redismake cd srcmake install PREFIX=/usr/local /redis whereis redis-cli whereis redis-server
4.自定义配置文件
1
2
3
4
cd /usr/local /redismkdir /usr/local /redis/etc cp redis.conf /usr/local /redis/etc
5.配置redis为后台启动
1
2
vi /usr/local/redis/etc/redis.conf # daemonize no -> daemonize yes
6.启动Redis
1 2 3 /usr/local /redis/bin/redis-server /usr/local /redis/etc/redis.conf redis-server /usr/local /redis/etc/redis.conf redis-server &
7.设置Redis密码
1
2
3
4
5
6
7
8
9
10
11
12
13
14
redis-cli config get requirepass config set requirepass password exit [root@MyAliYunServer etc] 127.0.0.1:6379> auth password redis-cli -h 127.0.0.1 -p 6379 -a password [root@MyAliYunServer ~] 127.0.0.1:6379> ping (error) NOAUTH Authentication required.
1
2
# requirepass foobared requirepass password
8.关闭Redis
1 2 3 4 5 6 7 redis-cli shutdown pkill redis ps -ef |grep redis netstat -lntp | grep 6379 kill -9 PID
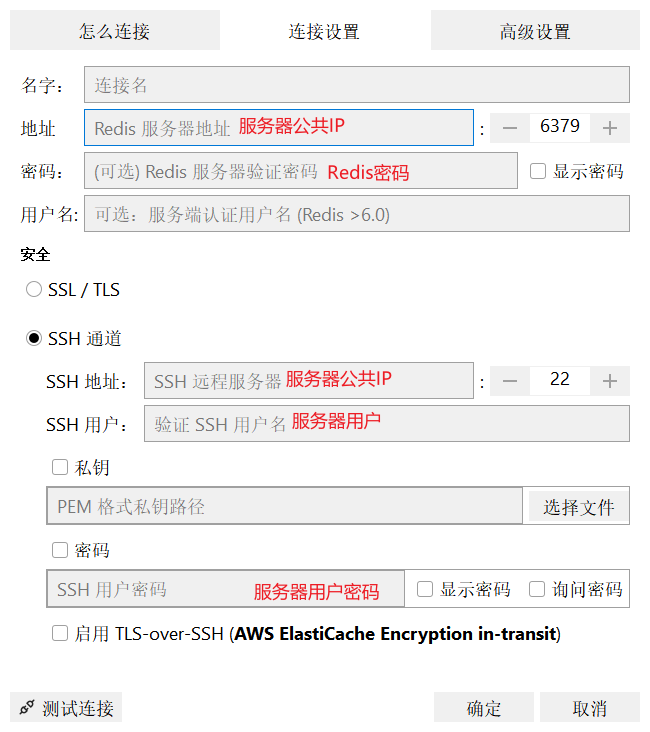
远程连接
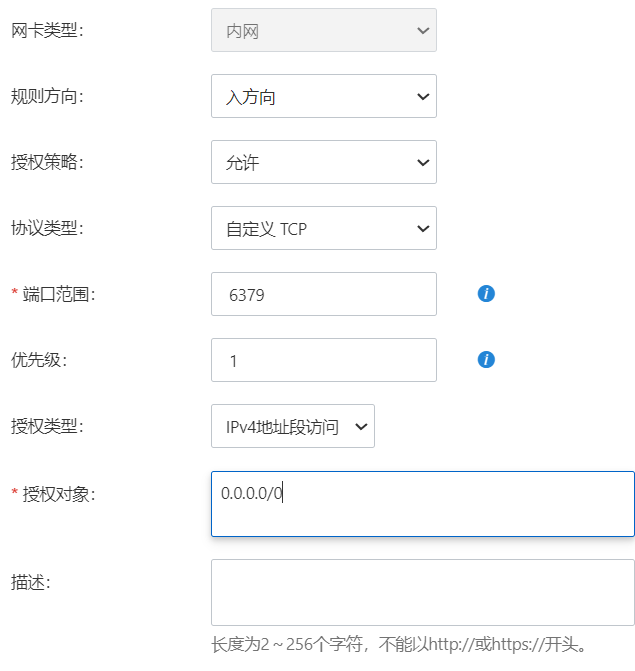
1.阿里云安全组配置(授权对象尽量为固定IP或者固定IP段)
2.Redis配置(/usr/local/redis/etc/redis.conf)
1
2
# bind 127.0.0.1 -::1 protected -mode no
3.重启Redis服务
1
2
redis-cli shutdown redis-server /usr/local /redis/etc/redis.conf
4.RESP.app
问题 1.java.sql.SQLNonTransientConnectionException: Public Key Retrieval is not allowed
连接数据库的url中加上allowPublicKeyRetrieval=true
思考:继承BaseMapper的接口无法注入实现类有可能是数据库问题